Thursday, June 30, 2016

Fort Gaines, Dauphin Island- Alabama

While on a visit to a few beaches on the United States gulf coast, I found out that two historic forts on either side of Mobile Bay were in the vicinity of the place we had chosen to call home for the duration of our stay. One of them, Historic Fort Gaines, was on Dauphin island. Going there had added advantages, a refreshing ferry ride from Fort Morgan to Dauphin Island, a hike through the Audubon Bird Sanctuary for a chance to see some migratory birds, and visiting the historic fort.

Once off the ferry, Fort Gaines is only a little distance up the road. It is a well preserved masonry fort from the Civil War era.
A sign with two cannons under it stands at the entrance of the fort. The fort is designed in the shape of a pentagon and was established in 1821. It was named after Edmund Pendleton Gaines, a distinguished United States army officer. You can read more about the history of the fort here and here.

Fort Gaines, Dauphin Island, Alabama

As you get to the entrance, you see a moat surrounding the castle with a concrete version of a drawbridge to welcome visitors.
A nice gift shop is on the left and after paying an entry fee, it was time to explore! Once inside, there is a central courtyard with several buildings on the periphery. Five of the original brick buildings of the fort still stand.


The Officer's kitchen, with a sign explaining the layout of the structure. There was also a bakery adjacent to it.


A fireplace and some kitchen utensils on a shelf in the brick-walled kitchen.


As I was looking around, storms were threatening to roll in. The sky had turned an ominous grey. It began to rain, large drops peltering down, water collecting in open areas. Looking out into the courtyard where a lone bell hung on a post, rain pounded down heavily. That added to charm of the historic site.

As soon as it subsided a little, I resumed my exploration, and decided to climb up the stairs you see at a distance in the picture.


On getting up to the top, you get a great view of the gulf. You also see interesting design details. Original cannons used in the Battle of Mobile Bay during the Civil War still stand on bastions at the corners of the five sided structure.

Cannon at Fort Gaines, Dauphin Island, Alabama

Turning around, you see another corner overlooking Mobile Bay, where another cannon stands.

Cannon at Fort Gaines, Dauphin Island, Alabama

A view from the wall of the fort with a cannon atop a bastion.
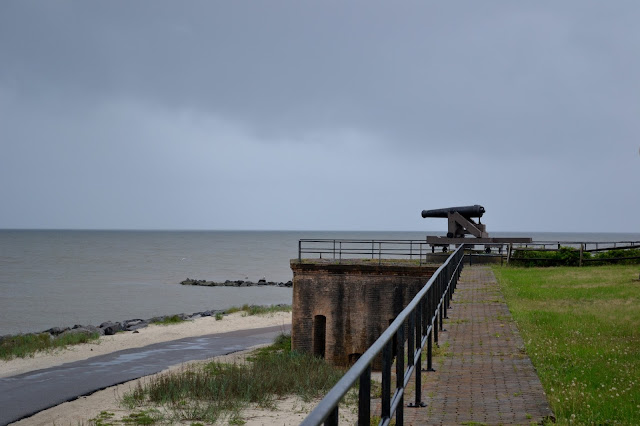
Cannon at Fort Gaines, Dauphin Island, Alabama

Stairs leading down from the top into the heart of the bastion.


Arched columns supporting the structure with windows looking into the courtyard and outside. 


A sign explains that this was where the powder, shells and shots were stored during the American Civil War, and smaller, insulated, rooms inside these rooms were used to store shells and shots to protect them from the dampness that seeped in from the bricks.

Inside a bastion at Fort Gaines, Dauphin Island, Alabama

There are interconnecting brick lined tunnels, this one connecting to the courtyard.

Fort Gaines, Alabama

Stepping out into the open from the tunnel, brick walls with windows that have witnessed so much history stand mute. 

 Fort Gaines, Dauphin Island, Alabama

Looking back into the tunnel from the courtyard. The design is so intriguing.

 Fort Gaines, Dauphin Island, Alabama

In the courtyard, is the huge anchor from USS Hartford. In the background are two original brick buildings. 

Anchor from USS Hartford, Fort Gaines, Dauphin Island, Alabama

There is a blacksmith's workroom nearby where a blacksmith demonstrates his skills to visitors who ask for a tour. Historic reenactment events are also regularly held at the fort. Here, a cannon shot had just been fired after one such event.


The fort is threatened by tropical storms, hurricanes and also sand dune erosion. It is listed as one of the top eleven endangered historic battlefields from the American Civil War period.


Monday, June 27, 2016

Pensacola

Summers and beaches! There's a connection between the two that transcends geography, race and culture. Shaved ice, ice cream cones, cool beachwear and colorful sun umbrellas spell summer! On a recent visit to Pensacola, Florida, all of these were in abundance! 

Pensacola

We stopped at a beach a little further away from the crowd, and found this dream location that seemed to have everything going for it that day. Blue skies, white sands, green grasses, and the sea reflecting various hues of blue and aquamarine! Signs all along talked about a beach restoration project. These sand dunes need to be protected, and I hope the authorities are meeting with success, with help from the public.

Pensacola Beach

A little boardwalk leading to the beach.


To relax on a beach chair with the sound of the waves gently coming ashore, and the wind playing a song to that beat, is nothing short of perfect!


A motley mix of shells on the beach. There's no telling how far some may have traveled to get stranded on the sands here. Most may be from the area and then there may be a lone one among them that got carried by the currents that brought it far away from home. 


Once we were done with the beach, I followed signs that headed to the Pensacola Lighthouse and Museum. Lighthouses are very dear to me and I try to visit as many as I can. Something about them spells hope, beacons to a promise of a safe place ahead.

Pensacola Lighthouse and Museum

The lighthouse was established in 1859, and you can read more about it here. There are 177 steps that climb to the top of the tower and it offers spectacular views of the area. There is also a nice museum and a gift shop.


This little boat in the adjacent yard had no sign, but it looked interesting. I am not sure if it is permanent feature or was just resting there temporarily.


Pensacola Lighthouse and Museum

Part of a dolphin water tank at Pensacola. The marine biologist in me does seek out things that remind me of my gig as one. Have a good summer!

Dolphin Water Tank, Pensacola

Friday, June 24, 2016

Growing Cucumbers- Marketmore 76

Fresh cut cucumbers say "summer is here" like no other fruit or vegetable, and they perhaps have only watermelons for competition in making that statement!  I tried growing cucumbers several years ago and had moderate success. I decided it was time to try it again. My family loves them. It is a great snack on its own, or added to a variety of salads. 


This spring, I planted about 12 Marketmore 76 variety seeds. It was mid April. To my delight, all of them germinated.


By April 20, I put the seedlings into a raised bed and added a trellis to help them grow. Since all 12 seedlings were growing, I had to put them in three different spots in the garden. None were planted in full sun locations. 
All my kitchen scraps go into the compost bin, and I have a steady supply of compost to feed the soil and replenish depleted nutrients. I do not add any other fertilizer to the soil, and there are no chemicals in my yard that target pests either. Companion flowers like Marigold, Zinnias, Sunflowers have helped in keeping pests in check until now. 

Cucumber

May 5, and they were growing well.


May 15- they had taken to climbing up the trellis as was intended. It is fascinating to see how  young tendrils on the growing plant seek out support and reach towards the sky!


By May 28, the plants were dotted with yellow flowers. All of them were male flowers to begin with. This May, we had a lot of rain, and I suppose that was the reason things went a little slow.


By the first week of June, female flowers were also growing in good numbers. Here is a female flower that has been successfully pollinated. Notice the spines on the female flower ovary that will eventually become the fruit.


A male flower and a female flower on a vine that decided to spread away on the ground.


More male flowers.


In about 4 days, the young cucumbers begin to grow. The flower (corolla) is still attached to the fruit. The spines remain on the growing fruit.


In another 3-4 days, the cucumber is ready to be picked!


They grow quickly and it is such a joy to pluck fruit from the yard and on to the table!


Here is another perspective of the size of a female flower with a fully grown cucumber in the background.


Here are two cucumbers I picked yesterday. They are a good size, deliciously crisp and fresh, and have a wonderful flavor!


Tuesday, June 21, 2016

Raised Beds With Cedar Pickets

Last year, I got my first raised bed. It was made by cutting to size a 10 by 2 solid cedar plank that was 16 foot long. The raised bed dimensions were 6 feet by 2 feet. I did not take any picture of it while it was being assembled together or even as soon as it was made. Here is a picture of it at a later date, with plants growing in it. It is strong and sturdy, but after putting it out in the yard, I thought it was small. It served very well last year, with a great crop of cherry tomatoes, peppers, and three different kinds of basil, but I decided to work on increasing the working area when I got more raised beds in future.


This spring, I added one bed identical in size to the one last year.


I also added another raised bed, improvising and getting some more working area out of the cedar plank. This new bed is 4 feet by 4 feet. Sixteen square feet as compared to twelve in each of the above.


These beds are very sturdy and because they are made of cedar, they are untreated and safe to use for vegetables. However, I was looking at a more cost effective way to add more space to the vegetable garden. While at the home improvement store, I chanced upon cedar pickets and decided to build raised beds using them. The cost of the pickets is much lower than that of the sturdy plank, but I am compromising on quality and am not sure how long these beds will last. This is a trial, and here is how I made the beds. 
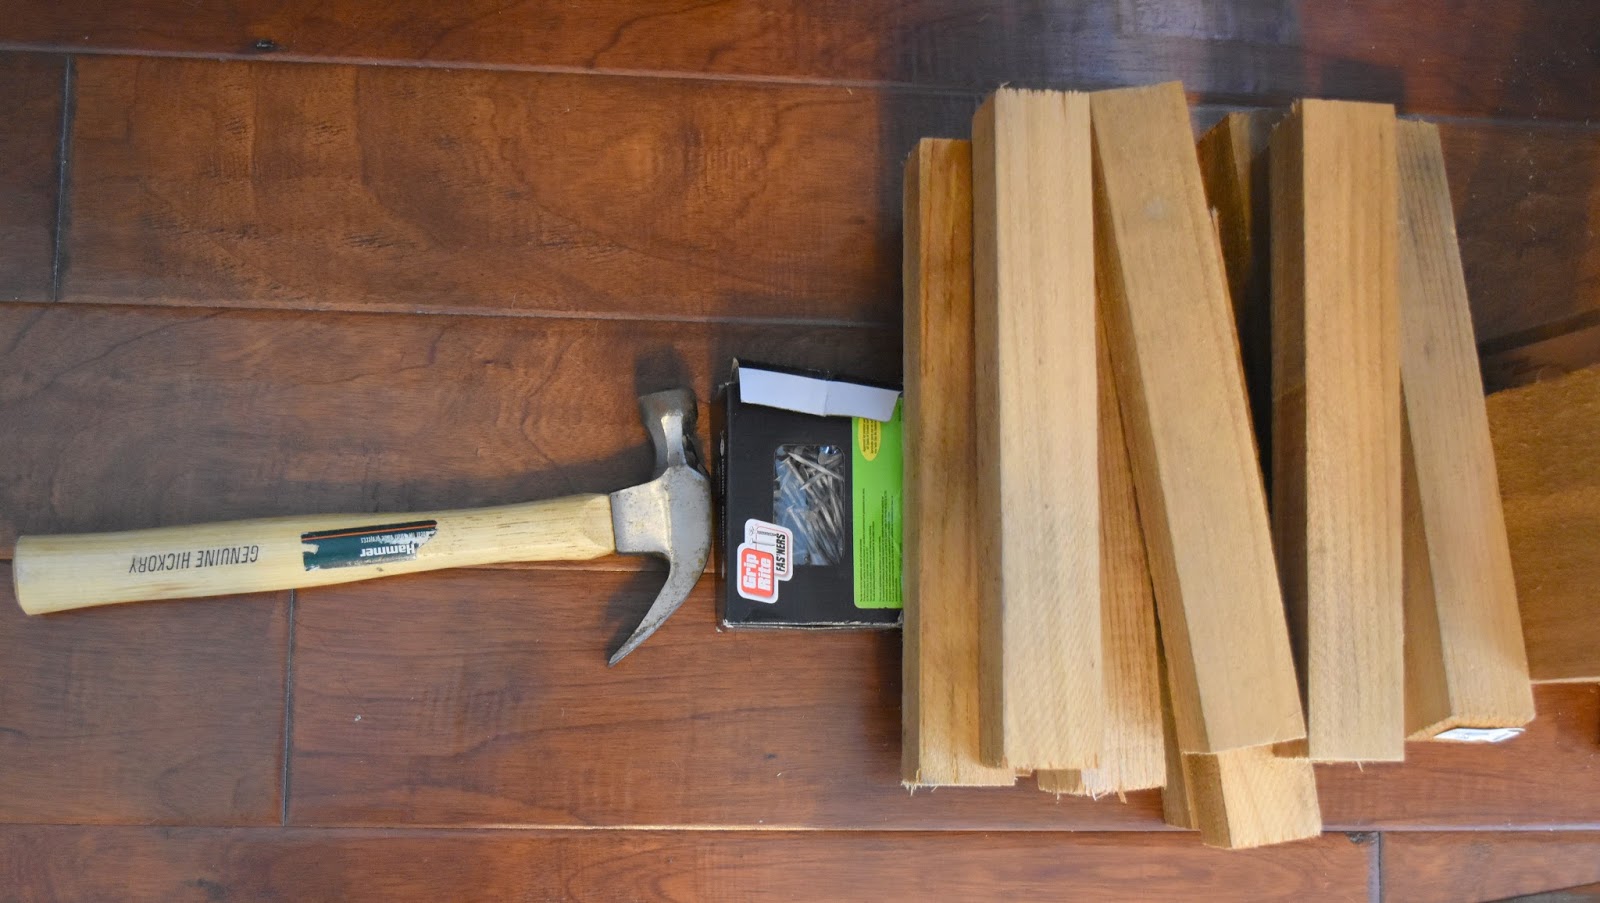
The sizes of pickets available were of two lengths- 6 ft and 8 ft. Both sizes were 6 inches in width. I used galvanized nails and a hammer to assemble the planks together.

Raised bed 1- 
Two 6 feet cedar pickets, each cut into two pieces of 4 feet and 2 feet 
Bed dimensions- 4 feet by 2 feet, with a height of 6 inches
This is a very basic design and I hope I can get it to work for a couple of years. I will post updates later. 


Raised bed 2- 
Two 8 feet cedar pickets, each one cut into four equal planks of two feet each, yielding 8 pieces
Bed dimensions- 2 feet by 2 feet, with a height of 12 inches

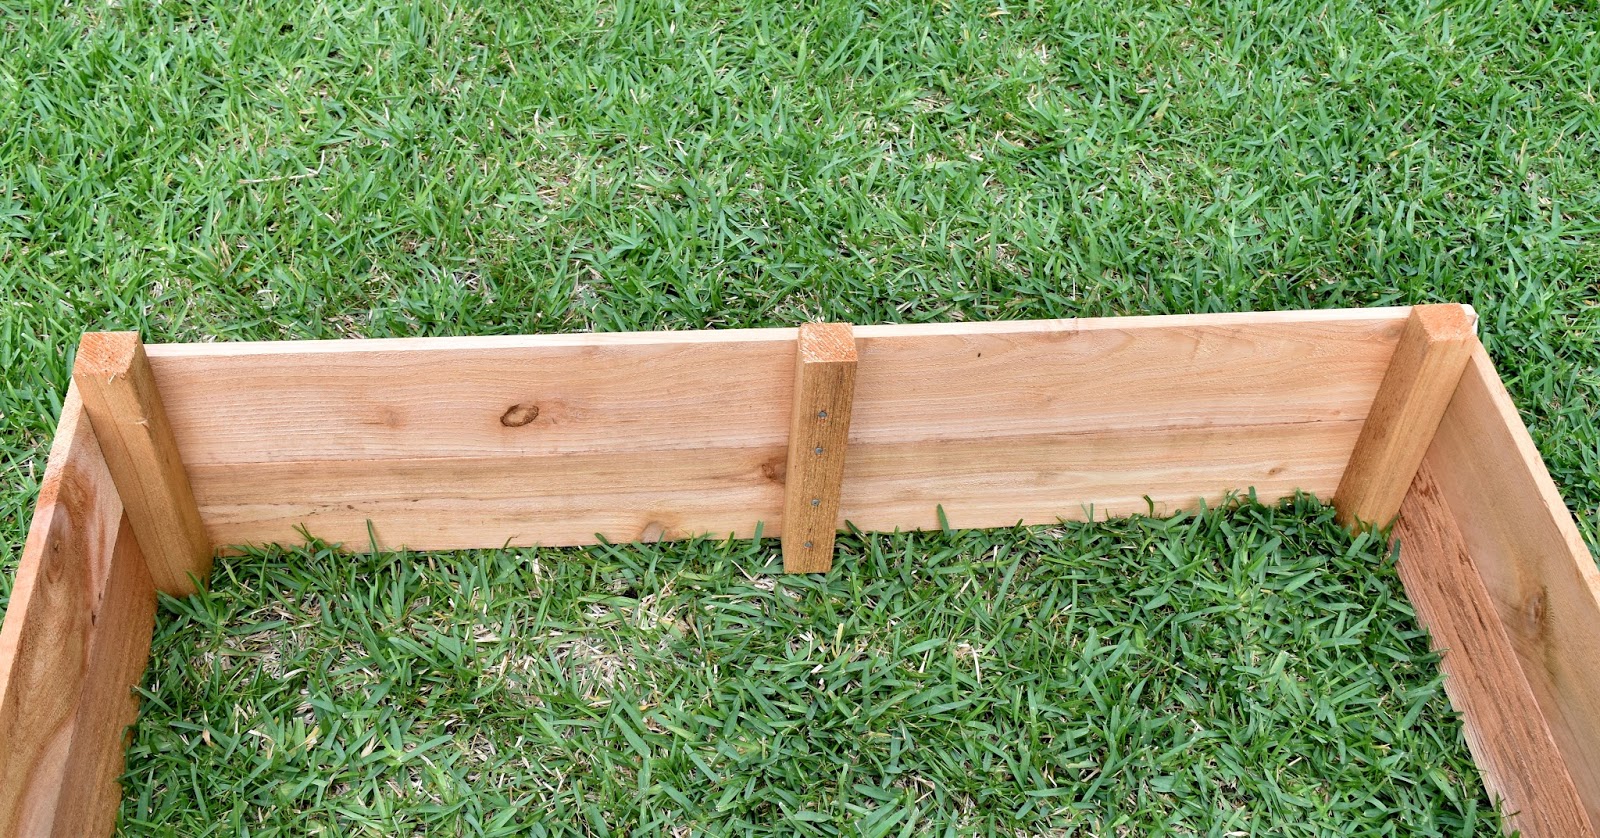
I decided that the new bed would need extra depth than the basic design above, so two pickets were stacked one above the other and stakes were used at the corners to secure the pieces together. 

A twelve foot long 2 by 2 cedar post was cut into twelve pieces of a foot each to use as stakes. 


Assembling the pieces together, securing one plank above another with a stake at either end. Then nailing together the sides on the stake.


The finished product.


The bed placed in the yard and filled with soil. Notice the difference in the thickness of the cedar. The sturdy cedar plank bed is twice as thick as the one made with pickets. It is a couple of inches deeper than the older raised bed though. 


Raised bed 3- 
Two 8 feet cedar pickets cut into half, yielding four 4 feet planks, 
Four 6 foot pickets 
Bed dimensions- 6 feet by 4 feet, with a height of 12 inches 

Two 6 foot pickets placed adjacent to each other and secured by nailing to a stake at either end.
                 

Nailed another stake in the center for additional support.


The finished product, with an area of 24 square feet.


 Close up of the side.


Now to hone in on my gardening skills!

Saturday, June 18, 2016

Yosemite- 3- The World of Granite

The geology of Yosemite National Park is predominantly granite. Some of the world's most recognizable rock formations are found at Yosemite, and they sure don't disappoint. The enormous faces of sheer, solid granite are not just awe-inspiring, they give you a perspective of how dynamic our planet is. The subduction zone along the coast of California, where the Pacific plate meets the North American plate, causes much upheaval in the region. These forces were behind the formation of the Sierra Nevada mountain range, and the action of glaciers and their subsequent melting gave rise to this landscape as we see it today.

In this picture, from the Tunnel View vista point, the popular El Capitan on the left, facing the Bridalveil Falls under Cathedral Rocks, further on the same side is the Sentinel Rock and Half Dome, under the clouds, and finally, Clouds Rest. A lot of these famous structures bring rock climbers from all over the world seeking the ultimate thrill of scaling yet another peak!

** Please click on the pictures to enlarge**

Yosemite as seen from Tunnel view vista point

It is hard to not think of Ansel Adams and his stunning photographs of these renowned landscapes. As a tribute to him, this picture of Half Dome as seen from Glacier Point in black and white. 

Half Dome from Glacier point

Merced river, which swells during spring with all the snow melting, drops 594 feet at Nevada Falls, the taller of the two, and then 317 feet at Vernal Falls. There are hikes from the valley to both these falls, and they fall under the moderate category. 


The Royal Arches beneath two domes above them, the North Dome on the left and Basket Dome to the right, as seen from Glacier Point. Different faces of these rocks can be seen from the valley from very different angles. 

Royal Arches from Glacier Point

The Royal Arches as seen from Mirror Lake. 


Cathedral Rocks as seen from a meadow in the valley. Higher Cathedral Rock to the left and Middle Cathedral on the right. 

Cathedral Rocks as seen from Yosemite Valley

Another view of Cathedral Rock from near the chapel in the valley.


Sentinel rock as seen from Sentinel beach. The dainty Sentinel Falls on the right can be seen only in spring. 


From the valley, just east of El Capitan are the Three Brothers peaks. The Eagle peak, Middle brother and Lower brother make up this formation, and are another landmark of the region.


Looking up at another towering granite face, I end this post.